想寫一些有關arduino的文章,可是偏偏痞客邦沒有內建的編輯器,爬文一下發現有一個不錯用的方式
可以參考一下文章
Syntax High Light (在 痞客邦部落格 中使用) Part2: highlight.js
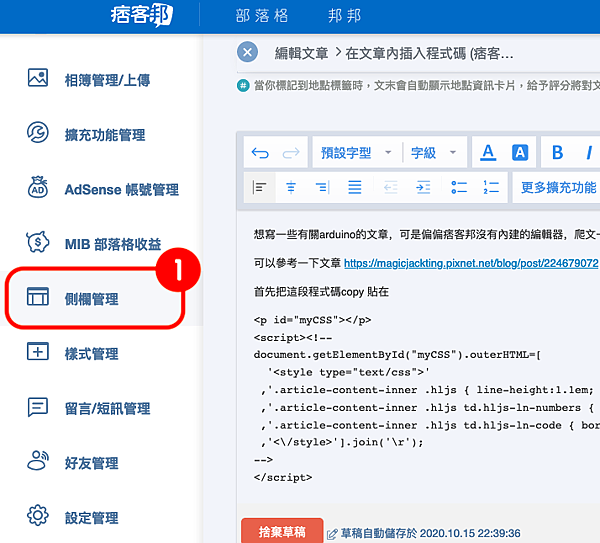
首先把這段程式碼copy
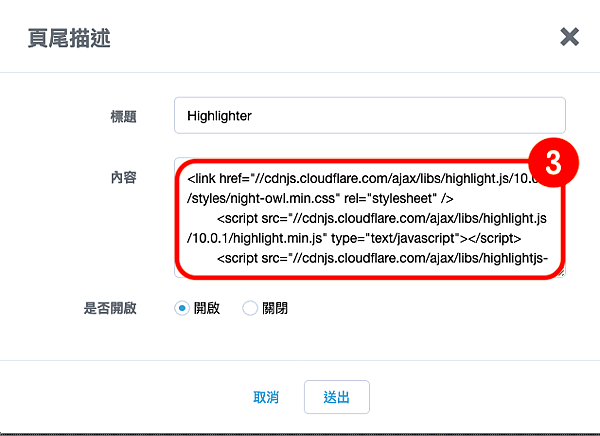
<link href="//cdnjs.cloudflare.com/ajax/libs/highlight.js/10.0.1/styles/night-owl.min.css" rel="stylesheet" />
<script src="//cdnjs.cloudflare.com/ajax/libs/highlight.js/10.0.1/highlight.min.js" type="text/javascript"></script>
<script src="//cdnjs.cloudflare.com/ajax/libs/highlightjs-line-numbers.js/2.7.0/highlightjs-line-numbers.min.js" type="text/javascript"></script>
<script><!--
hljs.initHighlightingOnLoad();
hljs.initLineNumbersOnLoad({singleLine: true});
--></script>
<p id="myCSS"></p>
<script><!--
document.getElementById("myCSS").outerHTML=[
 '<style type="text/css">'
 ,'.article-content-inner .hljs { line-height:1.1em; padding:.25em }'
 ,'.article-content-inner .hljs td.hljs-ln-numbers { text-align:right; padding-right:4px}'
 ,'.article-content-inner .hljs td.hljs-ln-code { border-left:2px solid #999; padding-left:5px }'
 ,'<\/style>'].join('\r');
-->
</script>
貼在 部落格後台>>側欄管理>>頁尾描述


在文章要插入程式碼的位置,切換成HTML編輯模式下貼上這一段
<div><pre>
<code class="arduino">從這裡開始寫你要上色的程式碼
...
你要上色的程式碼
...
</code>
</pre></div>
把要貼上的程式碼貼在<code class="arduino"> </code>之間 ex:
=========================================================
#include <ESP8266WiFi.h>
#include <WiFiClient.h>
#include <ESP8266WebServer.h>

#ifndef APSSID
#define APSSID "ESPap"
#define APPSK "thereisnospoon"
#endif

/* Set these to your desired credentials. */
const char *ssid = APSSID;
const char *password = APPSK;

ESP8266WebServer server(80);

/* Just a little test message. Go to http://192.168.4.1 in a web browser
 connected to this access point to see it.
*/
void handleRoot() {
 server.send(200, "text/html", "<h1>You are connected</h1>");
}

void setup() {
 delay(1000);
 Serial.begin(115200);
 Serial.println();
 Serial.print("Configuring access point...");
 /* You can remove the password parameter if you want the AP to be open. */
 WiFi.softAP(ssid, password);

 IPAddress myIP = WiFi.softAPIP();
 Serial.print("AP IP address: ");
 Serial.println(myIP);
 server.on("/", handleRoot);
 server.begin();
 Serial.println("HTTP server started");
}

void loop() {
 server.handleClient();
}

=========================================================
Highlight 上色後的程式碼 :
#include <ESP8266WiFi.h>
#include <WiFiClient.h>
#include <ESP8266WebServer.h>
#ifndef APSSID
#define APSSID "ESPap"
#define APPSK "thereisnospoon"
#endif
/* Set these to your desired credentials. */
const char *ssid = APSSID;
const char *password = APPSK;
ESP8266WebServer server(80);
/* Just a little test message. Go to http://192.168.4.1 in a web browser
connected to this access point to see it.
*/
void handleRoot() {
server.send(200, "text/html", "<h1>You are connected</h1>");
}
void setup() {
delay(1000);
Serial.begin(115200);
Serial.println();
Serial.print("Configuring access point...");
/* You can remove the password parameter if you want the AP to be open. */
WiFi.softAP(ssid, password);
IPAddress myIP = WiFi.softAPIP();
Serial.print("AP IP address: ");
Serial.println(myIP);
server.on("/", handleRoot);
server.begin();
Serial.println("HTTP server started");
}
void loop() {
server.handleClient();
}
=========================================================大功告成!
備註:只是有一點比較討厭,在程式碼這兩個符號< > 會被判定為 html語法,所以不會被顯示
所以要先置換掉 < 要置換成 < , > 要置換成 >
