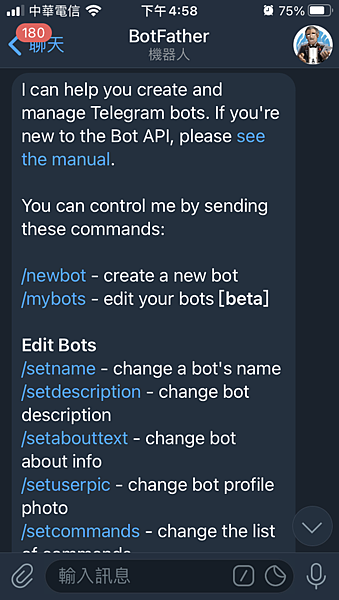
輸入/newbot申請一個機器人
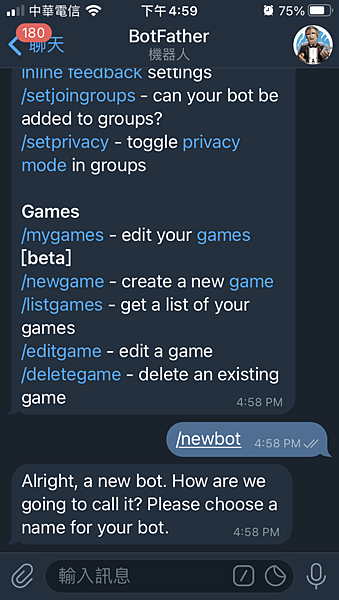
接下來幫機器人取個名字,中英文都可以我取個 “哨兵”
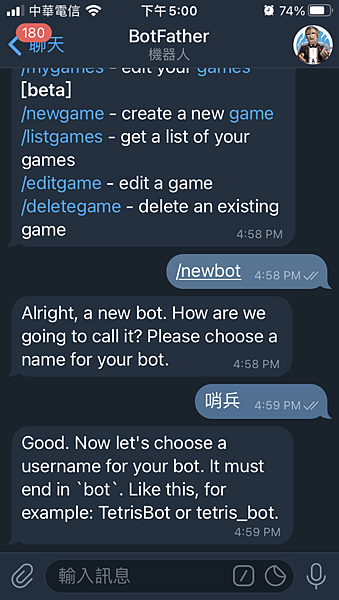
接下來輸入機器人的帳號,他是有命名規則,必須是英數字,最後結尾必須是Bot 或是 _bot,要注意一下
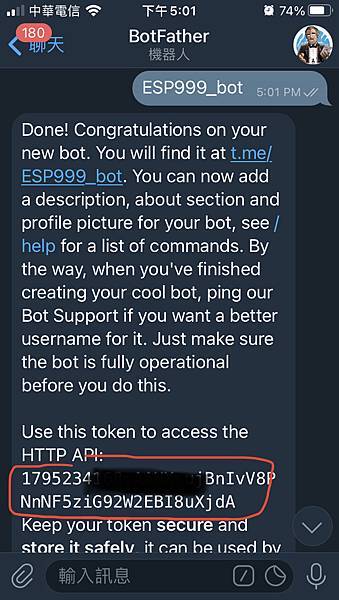
如果帳號重複就必須換個名字,成功了就會出現上面的畫面,紅色框框處就是機器人的API Token,把他複製起來,先存在其他地方,待會程式會用到。
注意不要洩漏你的Token,因為只要有這串Token就可以控制你的機器人。
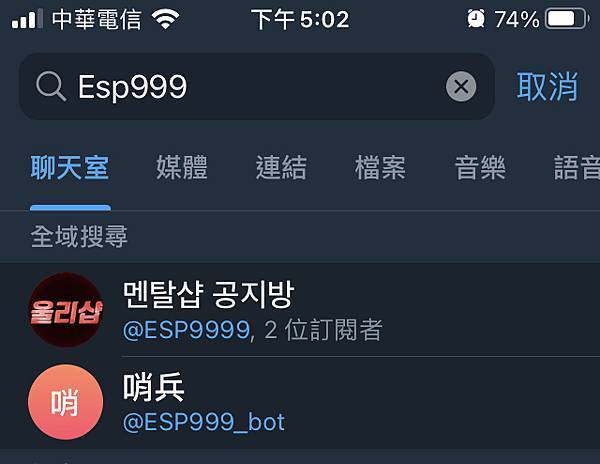
最後搜尋你的機器人帳號,應該就可以找到,輸入一些文字,目前不會有反應,還需要寫一些程式去控制。

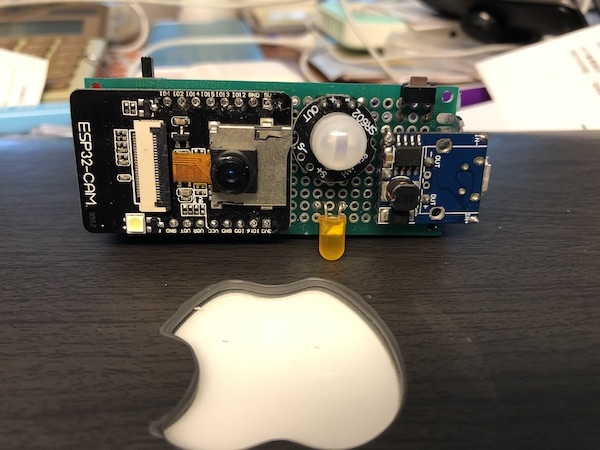
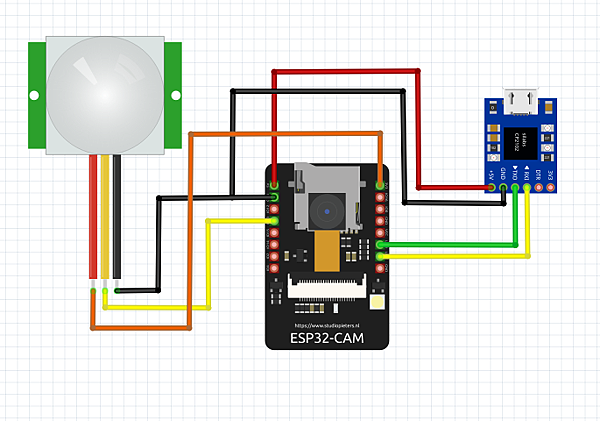
STEP 3. 將你的ESP32cam 線連接起來,因為ESP32cam板子需要用TTL寫入程式,另外我有外加一個PIR sensor 作為感測器。
PIR 是連接在GPIO 13
STEP 4. 上傳程式
首先Arduino IDE 要先安裝CTBOT的程式庫,

程式如下:
#include "WiFi.h" #include "WiFiClientSecure.h" #include "ArduinoOTA.h" #include "soc/soc.h" #include "soc/rtc_cntl_reg.h" #include "esp_camera.h" #include "EEPROM.h" #include "WiFiManager.h" #define BOT_TOKEN_LENGTH 50 #define PassWord_LENGTH 12 //CAMERA_MODEL_AI_THINKER #define CAMERA_MODEL_AI_THINKER #define PWDN_GPIO_NUM 32 #define RESET_GPIO_NUM -1 #define XCLK_GPIO_NUM 0 #define SIOD_GPIO_NUM 26 #define SIOC_GPIO_NUM 27 #define Y9_GPIO_NUM 35 #define Y8_GPIO_NUM 34 #define Y7_GPIO_NUM 39 #define Y6_GPIO_NUM 36 #define Y5_GPIO_NUM 21 #define Y4_GPIO_NUM 19 #define Y3_GPIO_NUM 18 #define Y2_GPIO_NUM 5 #define VSYNC_GPIO_NUM 25 #define HREF_GPIO_NUM 23 #define PCLK_GPIO_NUM 22 #define FLASH_LED_PIN 4 //閃光燈 bool flashState = LOW; //閃光燈狀態 char botToken[BOT_TOKEN_LENGTH] = ""; char PassWordd[PassWord_LENGTH] = ""; char new_pass[PassWord_LENGTH] = ""; char orgpass[12] = "123456"; char masterid[12] = ""; const char TEXT_START[] = "***歡迎進入看哨兵系統***" "\n" "您可以輸入指令或是點擊按鈕" "\n" "啟動或關閉哨兵" "\n" "/startwatch -啟動哨兵" "\n" "/stopwatch -關閉哨兵" "\n" "/status -哨兵狀態" "\n" "/photo -拍照" "\n" "/setpass -變更密碼" "\n" "/help -指令列表"; WiFiClientSecure clientTCP; #include "CTBot.h" CTBot myBot; CTBotReplyKeyboard myKbd; // reply keyboard object helper bool isKeyboardActive; //flag for saving data bool shouldSaveConfig = false; bool firstime = true; bool watchdog = false; bool pass_status = true; bool changepass = false; bool check_pass = false; bool check_again = false; bool ota_flag = false; uint8_t ledr = 33; const int OTA_Pin = 16;//OTA const int pir = 13; const int BotresetPin = 14; unsigned long ttime; unsigned long senderID; unsigned long masterID; String chatId = ""; //設定傳圖片的ID String BOTtoken = ""; //設定傳圖的token String sendPhotoTelegram(); String Router_SSID; String Router_Pass; String testpass = ""; String Oldpass = ""; void saveConfigCallback () { Serial.println("Should save config"); shouldSaveConfig = true; } void readBotTokenFromEeprom(int offset) { for (int i = offset; i < BOT_TOKEN_LENGTH; i++ ) { botToken[i] = EEPROM.read(i); } //EEPROM.commit(); } void readPassWord() { for (int i = 0; i < 12; i++ ) { PassWordd[i] = EEPROM.read(i + 60); } //EEPROM.commit(); } void readmasterid() { for (int i = 0; i < 12; i++ ) { masterid[i] = EEPROM.read(i + 80); } //EEPROM.commit(); } void writeBotTokenToEeprom(int offset) { for (int i = offset; i < BOT_TOKEN_LENGTH; i++ ) { EEPROM.write(i, botToken[i]); } Serial.println("Write EEPROM....."); for (int i = 0; i < 10; i++) { digitalWrite(ledr, HIGH); delay(200); digitalWrite(ledr, LOW); delay(100); } EEPROM.commit(); } void setup() { // initialize the Serial Serial.begin(115200); Serial.println("Starting TelegramBot..."); EEPROM.begin(128); pinMode(pir, INPUT); pinMode(BotresetPin, INPUT_PULLUP); pinMode(ledr, OUTPUT); pinMode(FLASH_LED_PIN, OUTPUT); pinMode(OTA_Pin, INPUT_PULLUP); digitalWrite(FLASH_LED_PIN, flashState); Serial.println("read bot token"); readBotTokenFromEeprom(0); Serial.println(botToken); Serial.println("password"); readPassWord(); Serial.println(PassWordd); readmasterid(); Serial.println(masterid); //wifimanager WiFi.mode(WIFI_STA); WiFiManager wm; wm.setDebugOutput(true); wm.setSaveConfigCallback(saveConfigCallback); WiFiManagerParameter custom_bot_id("botid", "Bot Token", botToken, 50); wm.addParameter(&custom_bot_id); wm.autoConnect("WatchDog"); Serial.println("WiFi connected"); Serial.println("IP address: "); IPAddress ip = WiFi.localIP(); Serial.println(ip); strcpy(botToken, custom_bot_id.getValue()); if (shouldSaveConfig) { writeBotTokenToEeprom(0); } //Start OTA 按住OTA鈕 燈閃3下放開進入OTA模式 if (digitalRead(OTA_Pin) == LOW) { for (int i = 0; i < 3 ; i++) { digitalWrite(ledr, HIGH); delay(500); digitalWrite(ledr, LOW); delay(500); } delay(3000); if (digitalRead(OTA_Pin) == HIGH) { Serial.println("OTA....."); ota_flag = true; ArduinoOTA.onStart([]() { String type; if (ArduinoOTA.getCommand() == U_FLASH) { type = "sketch"; } else { // U_FS type = "filesystem"; } // NOTE: if updating FS this would be the place to unmount FS using FS.end() Serial.println("Start updating " + type); }); ArduinoOTA.onEnd([]() { Serial.println("\nEnd"); }); ArduinoOTA.onProgress([](unsigned int progress, unsigned int total) { Serial.printf("Progress: %u%%\r", (progress / (total / 100))); }); ArduinoOTA.onError([](ota_error_t error) { Serial.printf("Error[%u]: ", error); if (error == OTA_AUTH_ERROR) { Serial.println("Auth Failed"); } else if (error == OTA_BEGIN_ERROR) { Serial.println("Begin Failed"); } else if (error == OTA_CONNECT_ERROR) { Serial.println("Connect Failed"); } else if (error == OTA_RECEIVE_ERROR) { Serial.println("Receive Failed"); } else if (error == OTA_END_ERROR) { Serial.println("End Failed"); } }); ArduinoOTA.begin(); Serial.println("Ready"); Serial.print("IP address: "); Serial.println(WiFi.localIP()); } delay(1000); if (digitalRead(OTA_Pin) == LOW) {//長按OTA鈕直到快閃6下,清除所有設定 Serial.println("Reset....."); wm.resetSettings(); for (int i = 0; i < 128; i++ ) { EEPROM.write(i, '\0'); } EEPROM.commit(); for (int i = 0; i < 6 ; i++) { digitalWrite(ledr, HIGH); delay(100); digitalWrite(ledr, LOW); delay(200); } ESP.restart(); } } else { // set the telegram bot token myBot.setTelegramToken(botToken); myBot.enableUTF8Encoding(true); //UTF8顯示中文 // check if all things are ok if (myBot.testConnection()) { Serial.println("\ntestConnection OK"); for (int i = 0; i < 5 ; ++i) { digitalWrite(ledr, HIGH); delay(200); digitalWrite(ledr, LOW); delay(200); } digitalWrite(ledr, HIGH); delay(1000); digitalWrite(ledr, LOW); } else { Serial.println("\ntestConnection NOK"); // set the pin connected to the LED to act as output pin digitalWrite(ledr, HIGH); // turn off the led (inverted logic!) } myKbd.addButton("啟動哨兵"); myKbd.addButton("關閉哨兵"); myKbd.addButton("哨兵狀態"); myKbd.addRow(); myKbd.addButton("拍照"); myKbd.addButton("指令列"); myKbd.addButton("變更密碼"); myKbd.enableResize(); isKeyboardActive = false; //camra setting camera_config_t config; config.ledc_channel = LEDC_CHANNEL_0; config.ledc_timer = LEDC_TIMER_0; config.pin_d0 = Y2_GPIO_NUM; config.pin_d1 = Y3_GPIO_NUM; config.pin_d2 = Y4_GPIO_NUM; config.pin_d3 = Y5_GPIO_NUM; config.pin_d4 = Y6_GPIO_NUM; config.pin_d5 = Y7_GPIO_NUM; config.pin_d6 = Y8_GPIO_NUM; config.pin_d7 = Y9_GPIO_NUM; config.pin_xclk = XCLK_GPIO_NUM; config.pin_pclk = PCLK_GPIO_NUM; config.pin_vsync = VSYNC_GPIO_NUM; config.pin_href = HREF_GPIO_NUM; config.pin_sscb_sda = SIOD_GPIO_NUM; config.pin_sscb_scl = SIOC_GPIO_NUM; config.pin_pwdn = PWDN_GPIO_NUM; config.pin_reset = RESET_GPIO_NUM; config.xclk_freq_hz = 20000000; config.pixel_format = PIXFORMAT_JPEG; //init with high specs to pre-allocate larger buffers if (psramFound()) { config.frame_size = FRAMESIZE_UXGA; config.jpeg_quality = 10; //0-63 lower number means higher quality config.fb_count = 2; Serial.println("UXGA"); } else { config.frame_size = FRAMESIZE_SVGA; config.jpeg_quality = 12; //0-63 lower number means higher quality config.fb_count = 1; Serial.println("SVGA"); } // camera init esp_err_t err = esp_camera_init(&config); if (err != ESP_OK) { Serial.printf("Camera init failed with error 0x%x", err); digitalWrite(ledr, HIGH); delay(1000); ESP.restart(); } // Drop down frame size for higher initial frame rate sensor_t * s = esp_camera_sensor_get(); s->set_framesize(s, FRAMESIZE_SVGA); // UXGASXGAXGASVGAVGACIFQVGAHQVGAQQVGA //end camra setting //開機傳送訊息 masterID = strtoul(masterid, NULL, 10); Serial.println(masterID); myBot.sendMessage(masterID, "哨兵系統啟動...請輸入密碼"); Serial.println("哨兵開機完成"); } } void loop() { // a variable to store telegram message data if (ota_flag) { ArduinoOTA.handle(); } else { TBMessage msg; botreset(); // 若接收到訊息 if (myBot.getNewMessage(msg)) { // step1======================================================== if (pass_status) { //啟動輸入密碼 if (msg.text.equalsIgnoreCase(PassWordd)) {//驗證密碼 pass_status = false; isKeyboardActive = true; senderID = msg.sender.id; String testpass = String(PassWordd); //設定傳圖ID String Oldpass = String(orgpass);//設定傳圖token Serial.println(testpass); Serial.println(Oldpass); myBot.sendMessage(msg.sender.id, TEXT_START, myKbd); if (String(masterid) != String(msg.sender.id)) { String(msg.sender.id).toCharArray(masterid, 12); for (int i = 80, j = 0; i < 92 , j < 12; ++i, ++j) { EEPROM.write(i, masterid[j]); } EEPROM.commit(); delay(100); Serial.println(String(masterid)); } } else if (testpass == Oldpass) myBot.sendMessage(msg.sender.id, "請輸入密碼 (預設值:123456)"); else myBot.sendMessage(msg.sender.id, "請輸入密碼"); } // step2======================================================== if (senderID == msg.sender.id) { if (msg.text.equalsIgnoreCase("/startwatch") msg.text.equalsIgnoreCase("啟動哨兵")) { digitalWrite(ledr, HIGH); myBot.sendMessage(msg.sender.id, "哨兵啟動"); watchdog = true; } else if (msg.text.equalsIgnoreCase("/stopwatch") msg.text.equalsIgnoreCase("關閉哨兵")) { digitalWrite(ledr, LOW); myBot.sendMessage(msg.sender.id, "哨兵關閉"); watchdog = false; } else if (msg.text.equalsIgnoreCase("/status") msg.text.equalsIgnoreCase("哨兵狀態")) { if (watchdog) myBot.sendMessage(msg.sender.id, "哨兵防護中..."); else myBot.sendMessage(msg.sender.id, "哨兵休息中..."); } else if (msg.text.equalsIgnoreCase("/help") msg.text.equalsIgnoreCase("指令列")) { myBot.sendMessage(msg.sender.id, TEXT_START); } else if (msg.text.equalsIgnoreCase("/photo") msg.text.equalsIgnoreCase("拍照")) { sendPhotoTelegram(); } // step3======================================================== else if (check_again) { if (msg.text.equalsIgnoreCase(new_pass)) { myBot.sendMessage(senderID, "密碼變更成功,請重新啟動"); pass_status = true; for (int i = 60, j = 0; i < 72 , j < 12; ++i, ++j) { EEPROM.write(i, new_pass[j]); } EEPROM.commit(); delay(100); ESP.restart(); } else myBot.sendMessage(senderID, "密碼錯誤,請重新操作"); check_again = false; } // step4======================================================== else if (check_pass) { msg.text.toCharArray(new_pass, 12); myBot.sendMessage(senderID, "請再次輸入密碼"); check_pass = false; check_again = true; } // step5======================================================== else if (changepass) { if (msg.text.equalsIgnoreCase(PassWordd)) { myBot.sendMessage(senderID, "密碼正確,請輸入新密碼 (英數字612碼)"); check_pass = true; } else myBot.sendMessage(senderID, "密碼錯誤,請重新操作"); changepass = false; } else if (msg.text.equalsIgnoreCase("/setpass") msg.text.equalsIgnoreCase("變更密碼")) { changepass = true; myBot.sendMessage(msg.sender.id, "請輸入舊密碼"); } //else{ // myBot.sendMessage(msg.sender.id, "汪汪..."); // } } } //mybot msg if (watchdog) { byte p = digitalRead(pir); if (p == HIGH) { sendPhotoTelegram(); for (int i = 0; i < 10 ; ++i) { digitalWrite(ledr, HIGH); delay(200); digitalWrite(ledr, LOW); delay(200); } digitalWrite(ledr, HIGH); myBot.sendMessage(senderID, "注意注意...有人入侵"); delay(1000); } } // wait 500 milliseconds delay(500); } } //************************ String sendPhotoTelegram() { const char* myDomain = "api.telegram.org"; String getAll = ""; String getBody = ""; String chatId = String(senderID); //設定傳圖ID String BOTtoken = String(botToken);//設定傳圖token Serial.println(chatId); Serial.println(BOTtoken); camera_fb_t * fb = NULL; fb = esp_camera_fb_get(); if (!fb) { Serial.println("Camera capture failed"); delay(1000); ESP.restart(); return "Camera capture failed"; } Serial.println("Connect to " + String(myDomain)); if (clientTCP.connect(myDomain, 443)) { Serial.println("Connection successful"); String head = "--RandomNerdTutorials\r\nContent-Disposition: form-data; name=\"chat_id\"; \r\n\r\n" + chatId + "\r\n--RandomNerdTutorials\r\nContent-Disposition: form-data; name=\"photo\"; filename=\"esp32-cam.jpg\"\r\nContent-Type: image/jpeg\r\n\r\n"; String tail = "\r\n--RandomNerdTutorials--\r\n"; Serial.println(head); Serial.println(tail); uint16_t imageLen = fb->len; uint16_t extraLen = head.length() + tail.length(); uint16_t totalLen = imageLen + extraLen; clientTCP.println("POST /bot" + BOTtoken + "/sendPhoto HTTP/1.1"); Serial.println("POST /bot" + BOTtoken + "/sendPhoto HTTP/1.1"); clientTCP.println("Host: " + String(myDomain)); Serial.println("Host: " + String(myDomain)); clientTCP.println("Content-Length: " + String(totalLen)); Serial.println("Content-Length: " + String(totalLen)); clientTCP.println("Content-Type: multipart/form-data; boundary=RandomNerdTutorials"); Serial.println("Content-Type: multipart/form-data; boundary=RandomNerdTutorials"); clientTCP.println(); clientTCP.print(head); Serial.print(head); uint8_t *fbBuf = fb->buf; size_t fbLen = fb->len; for (size_t n = 0; n < fbLen; n = n + 1024) { if (n + 1024 < fbLen) { clientTCP.write(fbBuf, 1024); fbBuf += 1024; } else if (fbLen % 1024 > 0) { size_t remainder = fbLen % 1024; clientTCP.write(fbBuf, remainder); } } clientTCP.print(tail); esp_camera_fb_return(fb); int waitTime = 10000; // timeout 10 seconds long startTimer = millis(); boolean state = false; while ((startTimer + waitTime) > millis()) { Serial.print("."); delay(100); while (clientTCP.available()) { char c = clientTCP.read(); if (c == '\n') { if (getAll.length() == 0) state = true; getAll = ""; } else if (c != '\r') { getAll += String(c); } if (state == true) { getBody += String(c); } startTimer = millis(); } if (getBody.length() > 0) break; } clientTCP.stop(); Serial.println(getBody); } else { getBody = "Connected to api.telegram.org failed."; Serial.println("Connected to api.telegram.org failed."); } return getBody; } //*************** void botreset() { if (digitalRead(BotresetPin) == LOW)//重設密碼123456 delay(1000); if (digitalRead(BotresetPin) == LOW) { //orgpass.toCharArray(PassWordd,12); for (int j = 0; j < 12; j++ ) { EEPROM.write(j + 60, orgpass[j]); } EEPROM.commit(); WiFiManager wm; wm.resetSettings(); Serial.println("Finished"); for (int j = 0; j < 20; j++ ) { digitalWrite(ledr, HIGH); delay(100); digitalWrite(ledr, LOW); delay(100); } ESP.restart(); } }========================================================== 程式上傳完成後,將ESP32cam reset,打開手機搜尋WiFi,找Watchdog,Configure WiFi將WiFi密碼及Telegram 的Token填入
等待ESP32cam 重新啟動就完成了!
程式說明:
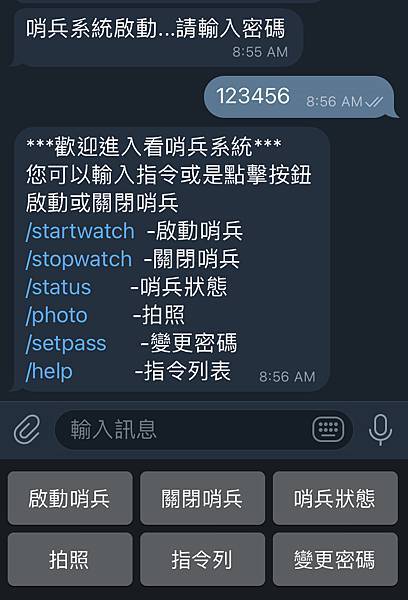
預設密碼 123456

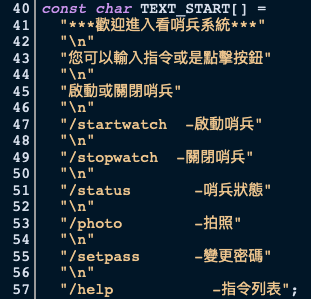
若要修改指令列的內容可以直接修改
ESP32cam 背面有一個預設的led 連接GPIO33,設定當作指示燈用
若不想每次都要接TTL上傳程式,可用OTA的方式,需另外再加一個按鈕,按住OTA鈕 ,然後按一下reset, 燈慢閃3下放開進入OTA模式
若繼續長按OTA鈕直到快閃6下,清除所有設定
PIR sensor 連接GPIO13
若忘記密碼 GPIO 14 短接,當指示燈快閃可以清除密碼,(第一次上傳程式後請執行一次,將密碼改為預設值123456,要不然怎麼輸入都不行的)

WiFi SSID 名稱,可自行修改

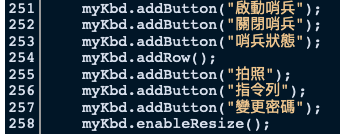
Telegram 自訂按鈕,按鈕名稱可自行修改,254行是將按鈕分行,也可以變成3行
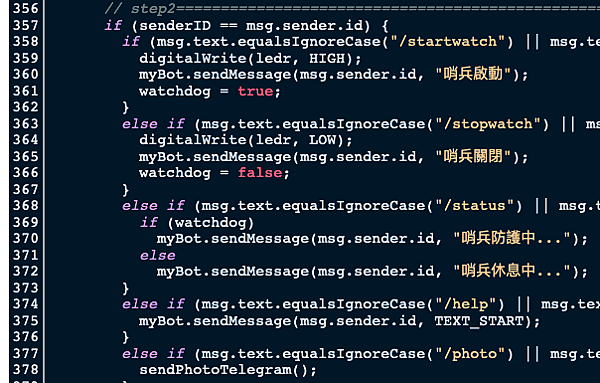
指令列跟程式內的文字要對應到,要不然機器人無法判讀
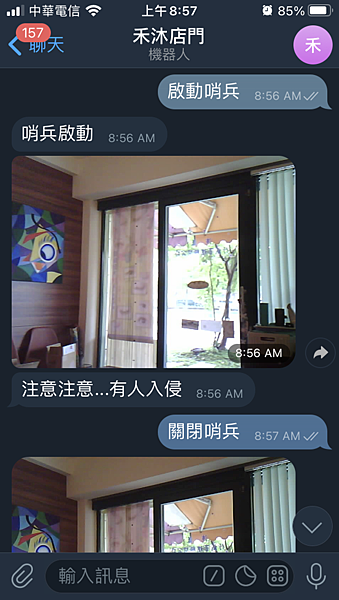
最後就發揮大家的創意,變成自己的監控機器人
